As usual, due to life and work, there’s been a big gap between blog posts. A lot has happened during the gap though, things are coming together. The upstairs deck is on, as well as gutters plus a test run with some flame zone cladding going onto one wall. The upstairs deck is a surprisingly decent size, my carpenters dubbed it a “car park”, and since it has finally obliterated any chance of water getting in between the containers, I have started on the interior fit out. It’s exciting to see my vision coming into reality, room by room.
Structural stuff first, but if you get through it all then in the following post you’ll be rewarded with a gorgeous copper shower recess inside a stylish rustic-vintage bathroom that oozes character.
This is not just any deck, not like the small entry decks downstairs that are made of Innex decking, this one is THE deck. The sundowner deck that sits at tree canopy level so you can look straight out at the birds. The deck that suffered from a severe personality crisis because it is also a roof and a floor, depending on whether you’re in the room underneath it or walking on top of it at the time. This caused chaos when reading the bushfire risk building regulations as the requirements for a floor, roof and a deck are all different. In fact, if you try to find “external floor” materials that comply with the bushfire risk rating that is BAL Flame Zone, your mind will be compressed to the size of a walnut from sheer frustration. In the end, I decided to go lateral and treat it mostly like a wall.
The logic went like this: an enclosed deck only has to be non-combustible, that’s it, however a roof has tonnes more specifications around it for BAL FZ, some of which are a bit much for a deck, and because you walk on the deck it can’t really be a roof no matter how much it would like to be. However, external floors are not a thing in BAL FZ, so it couldn’t be an outside floor because there were no guidelines to build one and nobody would guarantee their product for that application (I did try to convince one manufacturer, to no avail).
So the build criteria ended up as something that: i) passed building code for structure as a deck/patio, ii) had all the insulation and layers necessary to perform as a roof since it sits directly over a room, iii) was non-combustible like a deck, and iv) passed the minimum BAL FZ (FLR) rating of 30/30/30 which complies for both walls and roofs. For part iv, I used the same BAL FZ cladding as I planned to use for the walls, wrapping it up over the deck.
On top of that, it needed to be outrageously waterproof to make sure that no drips ever considered entering my house again. Therefore, it ended up as a structurally sound horizontal wall wearing a flame-proof wetsuit.
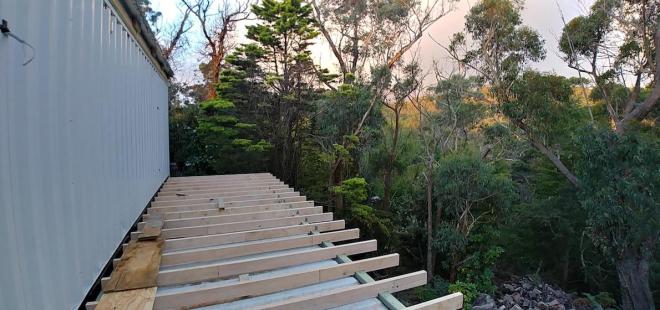 The timber structure for the deck.
In practical terms, after all the research it wasn’t all that tricky to build. I can say that because my team of carpenters built it for me, ha. There is no structural strength in the steel sheet of a container roof so the first step was to build a timber deck structure that sat over the top side rails and corners, which are load bearing. To help solve the water pooling issues that plagued the place, a good amount of fall was put into the deck so the water runs away from the container behind it.
Then mineral wool insulation was packed in to ensure the room below stays cosy, There is already spray foam on the inside of the ceiling below to prevent any condensation on the corrugated steel sheet, plus I threw in some internal insulation batts above the plasterboard so my ceiling/roof has an awesome insulation value that is fit for the minus 9 degrees celsius wind chill temperature that we had last week. A caution on R values, I learned the hard way that R values in the US are a different beast to those in Australia so bear that in mind if you end up reading about spray foam R values on American websites. If you’re looking at spray foam you might well end up on one as it’s much more widely used there.
Then, we snuggly wrapped the timber deck structure in Firefly super-duper-flame-zone-proof blanket which is also being used on all the walls. It only requires a non-combustible material over the top of that to achieve an FRL of 60/60/60. In this case the material was compressed fibre cement board, with fireproof sealant between the boards of course. It created that lovely industrial car park look that everyone craves when they design a sundowner deck.


The deck with the FC sheets on it, looking more car-park-like.
Waterproofing the deck/wall/roof
I’m not leaving it as a car park, it will be all tasteful tiles one day. However, given my usual rate of progress on this build, and the fact that my next priorities were for hot water and heating in the form of a wood stove, I knew I would not be tiling the deck anytime soon. I was warned that most waterproofing was designed to be covered pretty much immediately, so I put my research hat back on and found waterproofing that is UV stable and foot trafficable. It’s a roof waterproofing membrane called Sikalastic, so I had to pretend the deck/floor was a roof again.
Apart from having to buy a serious respirator and wear protective clothing to apply it, it went on pretty easily with a roller. Once dry it is inert, no more toxic vapours coming off it. Getting ready to apply it was trickier, I kept getting heavy dew over night which would run off from the roof onto the deck; there was no gutter on yet because the wall below the roof was not clad yet and that cladding is what the gutter attaches to. The deck had to be dry to apply the waterproofing, so I built a dodgy tent over the deck out of builders plastic to keep the water off it for two days before waterproofing. The 2nd coat then had to go on within 48 hours or I would have to start again and scape it all off, so I had to wait for a reliable window of fine weather for a few days before I started.


Left- the protective gear required for waterproofing, including some lovely disposable overalls. Right – the plastic tent under construction to prevent drips falling onto the deck during the waterproofing process.
My tent was a bit saggy and was not allowed to touch the 1st coat of waterproofing so I rolled it up, and I finished the 1st coat by early afternoon to give it time to touch dry before nightfall. I was a bit worried about the membrane drying properly until I saw that it was moisture curing, ie it draws moisture from the air and water pools on it as it sets, so a few drips onto it overnight didn’t matter as long as it was dry again before the 2nd coat. Next day I mopped the water off and put the plastic tent down again for the next night, it had been cold so I wanted to wait closer to 48hrs than 24hrs before re-coating.
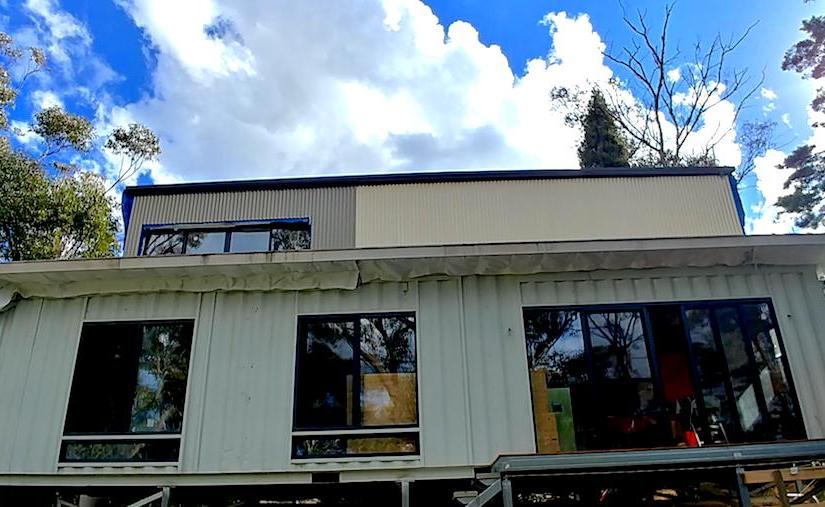
THE deck is done, mostly, and there are no more drips inside the house. Tiling and balustrades are still to come. The wall behind the deck is also done, using the same Firefly blanket and then Colorbond steel over the top. I’m having 4 colours of Colorbond on the house to make it interesting and so that if you see it from across the gully, from the ridge line opposite, it will disappear into the bush. Two colours on the top wall, and two below.
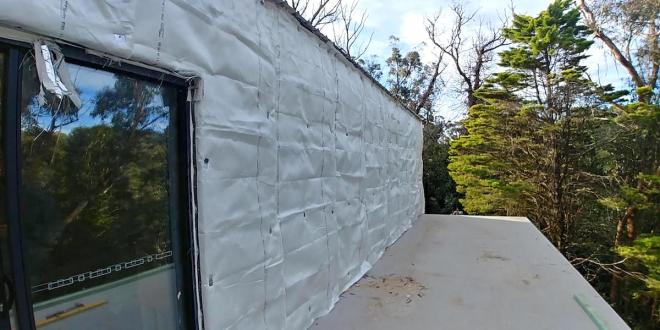 Firefly blanket on the wall, the same stuff that’s under the deck. The wall was battened out with timber first, and insulation batts added.
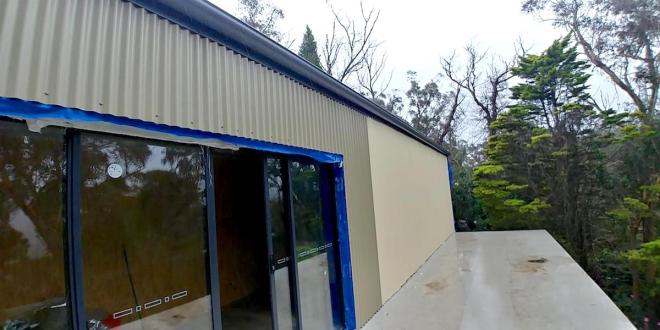 Waterproofed deck with finished clad wall behind it, with two Colorbond colours. The door framing still has to go on, so don’t get attached to the blue wall wrap.
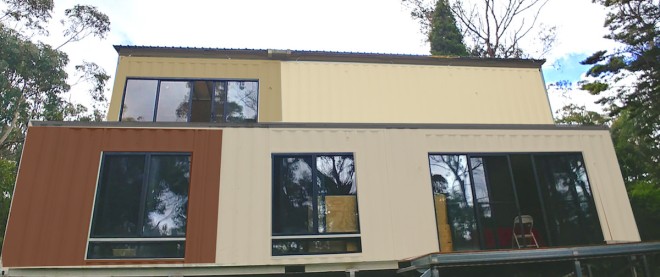 A mock-up showing a rough layout of the house colours. The top left colour turned out to be greener than this, as Colorbond don’t make this colour anymore.
Once the deck was done, the plasterboard ceilings went up inside, together with cornices. Painting has been slow as it needs to be 10 degrees or over inside the house to paint and it hasn’t been. The wood stove will fix that once it’s installed. The next post will be some of the interior, including my small but utterly gorgeous bathroom. Once the underfloor heating is on I might live in there until I get my wood stove in…
